This small pig clay sculpture is an example of 3-Dimensional art or sculpture. This 3-D form has three dimensions: height, width, and depth which are used to try and create an illusion of "reality".
Each student in 3-D General Art will write an essay on "How TO" make their favorite project from this class.
Read Ashley's for an example.
All Photos by Pamela Woods, ©2016
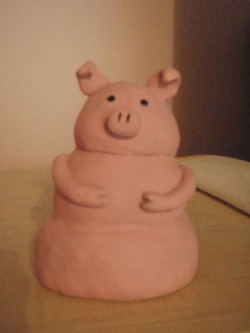
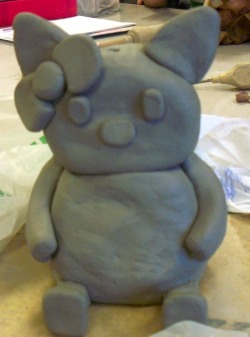
Making Ziggy the Piggy
Self Assessment by Ashley
I sketched several ideas in my sketchbook for the creation of a snowman sculpture. I wanted to do something different. I decided on making a pig. I created my piggy sculpture by first wedging the gray clay about 3 minutes on my tabletop. When I felt confident that I got all the air bubbles out of it, I began making my pig. I started by first making a large pinch pot for the bottom. A pinch construction is just that - you pinch the clay until it takes the form you want. A pinch pot looks like a little clay bowl. I followed this step 2 more times only making smaller pinch pots. When they were all constructed, I crosshatched and slipped the 3 bowls together on top of each other. I them poked my pencil through the middle of the pots to get a whole through each chamber. I did this so the moist air could escape from the pig as it dries and is fired in the kiln. If I did not create a spot for the moist air to escape from, my piggy could blow-up and not only would he be pig dust––he could destroy someone in my classrooms sculpture, too.
When I finished putting his body parts together, I did my details. I cross hatched the clay with my fork and added slip (water and clay made into a liquid clay paste) to keep everything in place. I added some wire that can handle the 1800'F temperature of the kin into my pig's arms to help keep them from breaking off. I then covered my pig loosely with a plastic bag to slowly dry. After 5 days of drying (sometimes is takes more time to dry) I took him out and put him in the kiln room to wait for his turn to be fired.
Finally my pig was fired in the kiln. The temperature is turned up slowly for a period of 7 hours. It needed to get up to 1800'F or cone 06. It also take a long time for the clay sculptures in the kiln to cool off. All together the process of firing lasts about 24 hours long. When he got out of the kiln, I washed him off and started to paint him with acrylic paint. I could have glazed him, but I didn't want to wait for him to go through the firing process again. I love this little piggy. He looks great and I learned a lot about working in 3-D and using clay as my medium. ––Ashley H., 2016
Read Ashley's for an example.
All Photos by Pamela Woods, ©2016
Making Ziggy the Piggy
Self Assessment by Ashley
I sketched several ideas in my sketchbook for the creation of a snowman sculpture. I wanted to do something different. I decided on making a pig. I created my piggy sculpture by first wedging the gray clay about 3 minutes on my tabletop. When I felt confident that I got all the air bubbles out of it, I began making my pig. I started by first making a large pinch pot for the bottom. A pinch construction is just that - you pinch the clay until it takes the form you want. A pinch pot looks like a little clay bowl. I followed this step 2 more times only making smaller pinch pots. When they were all constructed, I crosshatched and slipped the 3 bowls together on top of each other. I them poked my pencil through the middle of the pots to get a whole through each chamber. I did this so the moist air could escape from the pig as it dries and is fired in the kiln. If I did not create a spot for the moist air to escape from, my piggy could blow-up and not only would he be pig dust––he could destroy someone in my classrooms sculpture, too.
When I finished putting his body parts together, I did my details. I cross hatched the clay with my fork and added slip (water and clay made into a liquid clay paste) to keep everything in place. I added some wire that can handle the 1800'F temperature of the kin into my pig's arms to help keep them from breaking off. I then covered my pig loosely with a plastic bag to slowly dry. After 5 days of drying (sometimes is takes more time to dry) I took him out and put him in the kiln room to wait for his turn to be fired.
Finally my pig was fired in the kiln. The temperature is turned up slowly for a period of 7 hours. It needed to get up to 1800'F or cone 06. It also take a long time for the clay sculptures in the kiln to cool off. All together the process of firing lasts about 24 hours long. When he got out of the kiln, I washed him off and started to paint him with acrylic paint. I could have glazed him, but I didn't want to wait for him to go through the firing process again. I love this little piggy. He looks great and I learned a lot about working in 3-D and using clay as my medium. ––Ashley H., 2016
A "Hello Kitty" sculpture waiting to be dry enough to fire in the kiln.
My best Art advice from Kelly,
3-D General Art
Sometimes the hardest part of creating in clay is just waiting to let sculptures dry properly. If you put a piece in the kiln too early, the wet clay will crack and break apart. The clay piece must slowly dry before it can be put into the kiln. After all your hard work you want it to survive the firing process.
Photo by Pamela Woods, ©2016
<META NAME="description" CONTENT="This is a educational website for the use of my AHS Art students only ">
<META NAME="author" CONTENT="P. Woods at [email protected]">
<META NAME="copyright" CONTENT="This group of lessons, materials, or quotes are only to be used by author and her students. If you want to use any part of the site contact the author, P. Woods at [email protected] for permission.© 2016>